OnePlus 3 (oneplus-oneplus3): Difference between revisions
Appearance
Ungeskriptet (talk | contribs) Fix corruption |
HenriDellal (talk | contribs) m packaged = yes |
||
| (4 intermediate revisions by 4 users not shown) | |||
| Line 8: | Line 8: | ||
| imagecaption = OnePlus 3 with Plasma Mobile UI | | imagecaption = OnePlus 3 with Plasma Mobile UI | ||
| releaseyear = 2016 | | releaseyear = 2016 | ||
| chipset = Qualcomm | | chipset = Qualcomm Snapdragon 820 (MSM8996) | ||
| cpu = Kryo 2x2.2 GHz + 2x1.6 Ghz | | cpu = Kryo 2x2.2 GHz + 2x1.6 Ghz | ||
| gpu = Adreno 530 | | gpu = Adreno 530 | ||
| Line 15: | Line 15: | ||
| memory = 6 GB | | memory = 6 GB | ||
| architecture = aarch64 | | architecture = aarch64 | ||
| status_usbnet = | | type = handset | ||
| status_usbnet = Y | |||
| status_flashing = Y | | status_flashing = Y | ||
| status_touch = N | | status_touch = N | ||
| status_screen = | | status_screen = P | ||
| status_wifi = | | status_wifi = Y | ||
| status_xwayland = | | status_xwayland = | ||
| status_fde = | | status_fde = | ||
| Line 34: | Line 35: | ||
| status_calls = | | status_calls = | ||
| booting = yes | | booting = yes | ||
| packaged = yes | |||
}}{{Based on SoC|Qualcomm_Snapdragon_820/821_(MSM8996)|Snapdragon 820}} | }}{{Based on SoC|Qualcomm_Snapdragon_820/821_(MSM8996)|Snapdragon 820}} | ||
== Contributors == | == Contributors == | ||
Latest revision as of 13:59, 3 April 2025
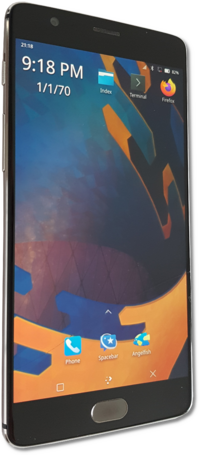
 OnePlus 3 with Plasma Mobile UI | |
| Manufacturer | OnePlus |
|---|---|
| Name | 3 |
| Codename | oneplus-oneplus3 |
| Released | 2016 |
| Type | handset |
| Hardware | |
| Chipset | Qualcomm Snapdragon 820 (MSM8996) |
| CPU |
Kryo 2x2.2 GHz 2x1.6 Ghz |
| GPU | Adreno 530 |
| Display | 1080x1920 AMOLED |
| Storage | 64 GB |
| Memory | 6 GB |
| Architecture | aarch64 |
| postmarketOS | |
| Category | testing |
| Pre-built images | no |
| Mainline | yes |
| Flashing |
Works |
|---|---|
| USB Networking |
Works |
| Internal storage |
No data |
| SD card |
No data |
| Battery |
Broken |
| Screen |
Partial |
| Touchscreen |
Broken |
| Multimedia | |
| 3D Acceleration |
Broken |
| Audio |
No data |
| Camera |
No data |
| Camera Flash |
No data |
| Connectivity | |
| WiFi |
Works |
| Bluetooth |
Broken |
| GPS |
No data |
| NFC |
No data |
| Modem | |
| Calls |
No data |
| SMS |
No data |
| Mobile data |
No data |
| Miscellaneous | |
| FDE |
No data |
| USB OTG |
No data |
| HDMI/DP |
No data |
| Sensors | |
| Accelerometer |
No data |
| Magnetometer |
No data |
| Ambient Light |
No data |
| Proximity |
No data |
| Hall Effect |
No data |
| Haptics |
No data |
| Barometer |
No data |
| This device is based on the Snapdragon 820. See the SoC page for common tips, guides and troubleshooting steps |
Contributors
Maintainer(s)
Users owning this device
- Bczeman
- Bdju (Notes: partially broken/disassembled)
- Caesarhao (Notes: European version)
- Harryausten (Notes: disassembled with UART connected)
- Jja2000
- Jrg (Notes: Broken touchscreen)
- MasterPlexus (Notes: still on Lineage)
- Nspire
- Rjeli
- Roboe (Notes: bloated battery (removed), might try to make a charging circuit or get a replacement sometime; aftermarket screen replacement, lot of issues with CPU suspend; running Lineage OS)
- Santeri3700
- Shubhamvis98
- Ungeskriptet (Notes: Glass lifts off a little, needs new glue)
Unlocking the Bootloader
WARNING: Doing this will wipe ALL data on your device. Please backup all your personal data before continuing!
- Enable
Developer optionsby tapping the build number 7 times inSettings>About - Go to
Developer optionsand enable bothUSB DebuggingandOEM Unlocking - Open a terminal window and type
adb devicesto verify your device is visible. - Type
adb reboot bootloaderto reboot your device into fastboot mode. - Type
fastboot devicesto verify once again that your device is visible. - Type
fastboot oem unlock. To navigate the on screen options use and select an option with the button. - Congrats, your bootloader is now unlocked!
Enter Flashmode
- After the bootloader is unlocked press the button and you should see the warning screen. Press to open the boot options.
- Select
Fastbootand press
You are now ready to flash.
Installation
UART
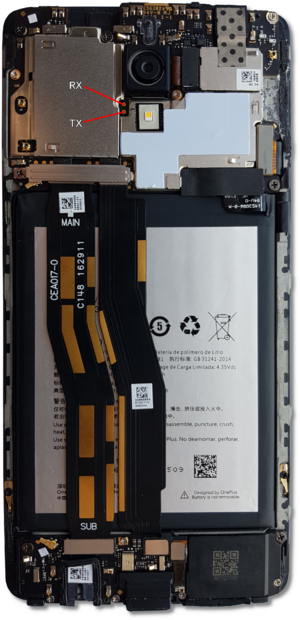
Start by removing the 2 T2 screws at the bottom which are holding the back cover together and then pry the back cover up from the bottom. The 2 points are located below the camera
| Note: For some peculiar reason, UART doesn't work with the back cover attached. |
Bootloader UART logs:
