Xiaomi Redmi Note 8T (xiaomi-willow): Difference between revisions
No edit summary |
No edit summary |
||
| Line 99: | Line 99: | ||
=== (Hard) UART === | === (Hard) UART === | ||
Necessary: reasonably fine soldering iron tip, steady hand | |||
Highly recommended: microscope, steadier hand | |||
* Disassemble the phone. [https://youtu.be/xWvFOEW-n1o Here]'s a decent video. | * Disassemble the phone. [https://youtu.be/xWvFOEW-n1o Here]'s a decent video. | ||
| Line 105: | Line 106: | ||
* After removing the glass, remove the ~12ish green screws holding the upper panel in place. One is hidden under a sticker. Pop the panel off with more prying, as gently as you can but some force will be needed. | * After removing the glass, remove the ~12ish green screws holding the upper panel in place. One is hidden under a sticker. Pop the panel off with more prying, as gently as you can but some force will be needed. | ||
* This is the end of disassembly, the test points are now exposed. | * This is the end of disassembly, the test points are now exposed. | ||
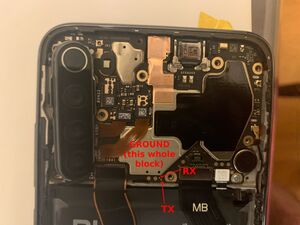
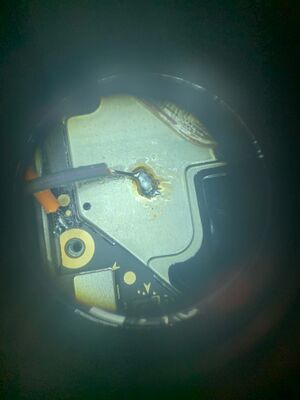
* Solder as shown in diagram. | |||
* Test connectivity between everything to make sure there's no shorts. | |||
* Connect to your favorite UART adapter. It expects 1.8v, but I used [https://www.sparkfun.com/products/12731 this] adapter that only goes down to 3.3v, and it hasn't bricked yet. | |||
[[File:Xiaomi_Willow_UART_locations.jpeg|thumb|Test point locations]] | [[File:Xiaomi_Willow_UART_locations.jpeg|thumb|Test point locations]] | ||
Revision as of 09:15, 29 April 2020
|
Redmi Note 8T Redmi Note 8T | |
| Manufacturer | Xiaomi |
|---|---|
| Name | Redmi Note 8T |
| Codename | xiaomi-willow |
| Released | 2019 |
| Hardware | |
| Chipset | Qualcomm SDM665 Snapdragon 665 (11 nm) |
| CPU |
Octa-core (4x2.0 GHz Kryo 260 Gold 4x1.8 GHz Kryo 260 Silver) |
| GPU | Adreno 610 |
| Display | 1080 x 2340 IPS LCD |
| Storage | 32GB, 64GB, 128GB |
| Memory | 3GB, 4GB, 4GB |
| Architecture | aarch64 |
| Software | |
Original software |
Android 9, MIUI 10 |
Extended version |
Android 9, MIUI 10 |
| postmarketOS | |
Mainline |
no |
pmOS kernel |
4.14.117 |
Unixbench score |
4168.2 |
| Device package |
|
| Kernel package |
|
Flashing |
Works
|
|---|---|
USB Networking |
Partial
|
Battery |
Untested
|
Screen |
Partial
|
Touchscreen |
Works
|
| Multimedia | |
3D Acceleration |
Broken
|
Audio |
Untested
|
Camera |
Untested
|
| Connectivity | |
WiFi |
Broken
|
Bluetooth |
Untested
|
GPS |
Untested
|
| Modem | |
Calls |
Untested
|
SMS |
Untested
|
Mobile data |
Untested
|
| Miscellaneous | |
FDE |
Untested
|
| Sensors | |
Accelerometer |
Untested
|
Contributors
Maintainer(s)
Users owning this device
- Alex92567 (Notes: Running LineageOS 22.2)
- Annaaurora (Notes: spare phone with pmOS flashed but not booting)
- DragonX256 (Notes: RU variant, collects dust on shelf)
- GamerTygoNL
- Kierownik223 (Notes: Stock software)
- Maciej (Notes: Main device, running LineageOS)
- Maddinkunze
- Rambonette (Notes: Main device, /e/ OS)
- Rjeli
- Secton (Notes: currently android because i couldn't calibrate touchscreen)
Note
This device is quite similar to the Xiaomi Redmi Note 7 (xiaomi-lavender), and many of the issues were solved with steps from that device page, so if you're hacking on the 8T it's a good idea to read the xiaomi-lavender page closely.
How to enter flash mode
Unlocking the bootloader
As with any Xiaomi device, in order to unlock the bootloader you need to sign up for a Mi Account, register your device through the MIUI Settings app (requires a working SIM inserted, but only for a few moments), and wait a week. The official Xiaomi tool only runs on Windows, but XiaoMiTool V2 worked for me on Debian Linux. Be careful, it's a closed source jar!
Before you go further
You are strongly recommended to install TWRP and back up ALL partitions to a safe place! (you can adb pull the images from twrp)
Entering recovery
Hold + until you see the recovery screen.
Entering fastboot
Hold + until you see the fastboot screen.
Installation
- Install pmbootstrap.
pmbootstrap -y zap; pmbootstrap init, choosexiaomi-willowas your device- firmware is currently needed for tianma touchscreen
- rndis doesn't work, and weston is currently the only working display server, so pick weston for ui if you want to know if the flash worked
pmbootstrap install- Enter fastboot, plug USB into computer
pmbootstrap flasher flash_kernelpmbootstrap flasher flash_rootfspmbootstrap flasher flash_vbmeta- Reboot, sometimes
fastboot rebootworks, otherwise hold down until it reboots to system. - Hopefully weston comes up with
postmarketos-demos.
Getting a shell
RNDIS doesn't work yet, not sure why. Could be an easy fix for someone more experienced with Qualcomm USB drivers.
(Easy) USB-C to Ethernet adapter
If you have a USB-C to Ethernet adapter with drivers already compiled into mainline, this will be easy. I had an iTeknic IK-UC002 lying around, which has an RTL8152 inside, merged into mainline a while ago and already included the downstream Kconfig. device-xiaomi-willow includes an interfaces file so that eth0 is DHCPed at boot, and then avahi-daemon will advertise itself at hostname.local.
So if the phone is connected to your LAN at boot through the adapter, you should be able to ssh user@xiaomi-willow.local from your computer.
(Hard) UART
Necessary: reasonably fine soldering iron tip, steady hand Highly recommended: microscope, steadier hand
- Disassemble the phone. Here's a decent video.
- I spent way too much time heating up the rubber and trying to use a suction cup. The glue is quite strong, and after heating up the edges to unreasonable temperatures I still couldn't pull the glass off with a suction cup. The key is to heat up the bottom a bit (around 100-150C) and use an extremely thin piece of metal to slide in the bottom and tear the rubber a bit. Then you can keep heating the edges and work your way around the perimeter.
- After removing the glass, remove the ~12ish green screws holding the upper panel in place. One is hidden under a sticker. Pop the panel off with more prying, as gently as you can but some force will be needed.
- This is the end of disassembly, the test points are now exposed.
- Solder as shown in diagram.
- Test connectivity between everything to make sure there's no shorts.
- Connect to your favorite UART adapter. It expects 1.8v, but I used this adapter that only goes down to 3.3v, and it hasn't bricked yet.


See also
- pmaports!1197 Initial merge request