Lenovo IdeaTab A3000 (lenovo-a3000): Difference between revisions
No edit summary |
|||
| Line 16: | Line 16: | ||
| status_usbnet = Y | | status_usbnet = Y | ||
| status_flashing = Y | | status_flashing = Y | ||
| status_touch = | | status_touch = Y | ||
| status_screen = | | status_screen = Y | ||
| status_wifi = | | status_wifi = N | ||
| status_xwayland = <!-- Showing X11 applications in a Wayland compositor (Weston, KWin, ...) works? --> | | status_xwayland = <!-- Showing X11 applications in a Wayland compositor (Weston, KWin, ...) works? --> | ||
| status_fde = <!-- When installing with full disk encryption, can you type in the password with the on screen keyboard? --> | | status_fde = <!-- When installing with full disk encryption, can you type in the password with the on screen keyboard? --> | ||
| status_mainline = P | | status_mainline = P | ||
| status_battery = | | status_battery = P | ||
| status_3d = <!-- Hardware accelerated 3D graphics (e.g. with freedreno) --> | | status_3d = <!-- Hardware accelerated 3D graphics (e.g. with freedreno) --> | ||
| status_accel = <!-- The sensor that measures proper acceleration works --> | | status_accel = <!-- The sensor that measures proper acceleration works --> | ||
| Line 33: | Line 33: | ||
| status_calls = <!-- Talking to other people over the cellular network. --> | | status_calls = <!-- Talking to other people over the cellular network. --> | ||
| status = <!-- Text displayed in the "not booting" table on the Devices page , e.g "kernel compiles, doesn't boot" --> | | status = <!-- Text displayed in the "not booting" table on the Devices page , e.g "kernel compiles, doesn't boot" --> | ||
| status_otg = | | status_otg = Y | ||
| status_nfc = <!-- Near-Field Communication (NFC) works --> | | status_nfc = <!-- Near-Field Communication (NFC) works --> | ||
| booting = yes <!-- The device is booting at all, can be yes/no *IMPORTANT* --> | | booting = yes <!-- The device is booting at all, can be yes/no *IMPORTANT* --> | ||
| Line 49: | Line 49: | ||
== Contributors == | == Contributors == | ||
* Tooniis | * Tooniis | ||
* | * Wujekbrezniew | ||
== Maintainer(s) == | == Maintainer(s) == | ||
<!-- Only if this device doesn't run on linux-postmarketos yet! --> | <!-- Only if this device doesn't run on linux-postmarketos yet! --> | ||
<!-- This person needs to be willing to answer questions from users of this device --> | <!-- This person needs to be willing to answer questions from users of this device --> | ||
* | * Wujekbrezniew | ||
== Users owning this device == | == Users owning this device == | ||
| Line 62: | Line 62: | ||
<!-- you may need to purge page cache to see changes (more->purge cache)--> | <!-- you may need to purge page cache to see changes (more->purge cache)--> | ||
<!-- you can use {{My devices}} on your profile page to show table with all your devices --> | <!-- you can use {{My devices}} on your profile page to show table with all your devices --> | ||
== Building == | |||
Building is not that easy as from normal kernel source. Kernel source that is linked in Sources section has non standard .config generation procedure. To edit kernel config you need to go to $kernel_source_dir/mediatek/config/mt6589/autoconfig/kconfig and edit "platform" file. Unfortunatelly running make overwrites .config by generating one config from mediatek/config folders. This depends on TARGET_KERNEL_PRODUCT value so "make menuconfig" is basicly useless. However you can generate .config by running "make menuconfig", check what values where added and copy them to mentioned "platform" file. This is bit tricky and propably will generate some config questions by running make so after changing some values you need to patch "platform" config by yourself. In this part you can try to build a kernel without pmbootstrap tools - in standard way that is described in many articles. Environmental values that are needed to build kernel standard way are in $kernel_source_dir/shell_variables so you only need to download proper toolchain (read this file to find out which) and later do . ./shell_variables. | |||
Fortunately proper fixes were added to config in kernel source git repo on branch "postmarketos" so if you only want to build a system for your A3000 you dont need to thinker problems that were mentioned in upper paragraph. | |||
Build kernel with --src flag linking to kernel source code directory. There's high propability that standard way of building will fail. | |||
Kernel config that is obligatory by pmbootstrap is basicly dummy because of how this source code works. Doing pmbootstrap Kconfig does not work because make will not have TARGET_KERNEL_PRODUCT value exported. | |||
== Flashing == | == Flashing == | ||
Fastboot is broken on this device. | Fastboot is broken on this device. | ||
To generate system.img and boot.img do: "pmbootstrap export [dir of choise]" after building system. To flash device you need SpFlashTool which works both on Windows and Linux (after unpacking and deleting lib folder) and flash files. Those can be obtained from Custom Android Build or from prebuild pmOS package. Both linked in sources section. SpFlashTool does not automaticaly detect PostmarketOS images so you need to select them manualy in gui. BOOTIMG will be PostmarketOS boot.img and SYSTEM will be lenovo-a3000.img. | |||
To create flash files by your own you need to resize partitions with MTK Partition Editor. However don't forget to persist partition layout in terms of names (this is not confirmed by 100% but removing unnecesary partitions can propably generate errors in "mmcblk names"). Prebuild package has modified partition sizes. | |||
== Sources == | == Sources == | ||
Kernel source: https://github.com/wujekbrezniew/android_kernel_lenovo_mt8389 | Kernel source: https://github.com/wujekbrezniew/android_kernel_lenovo_mt8389 Use postmarketos branch to build boot and system! | ||
Prebuild package: | |||
PostmarketOS files: | |||
Android device tree: https://github.com/wujekbrezniew/android_device_lenovo_a3 | Android device tree: https://github.com/wujekbrezniew/android_device_lenovo_a3 | ||
Android proprietary files: https://github.com/wujekbrezniew/proprietary_vendor_lenovo_a3 | Android proprietary files: https://github.com/wujekbrezniew/proprietary_vendor_lenovo_a3 | ||
Custom Android build (with all SpFlashTool files neccesary to format device): https://forum.xda-developers.com/t/rom-kitkat-4-4-2-v3-0-0-lenovo-a3000-h-stable-version.3414278/ | Custom Android build (with all SpFlashTool files neccesary to format device): https://forum.xda-developers.com/t/rom-kitkat-4-4-2-v3-0-0-lenovo-a3000-h-stable-version.3414278/ | ||
Device can be easily repartitioned with non-open source software called MTK Partition Editor: http://metweaks.com/mtk-partition-editor/ | Device can be easily repartitioned with non-open source software called MTK Partition Editor: http://metweaks.com/mtk-partition-editor/ | ||
== UART == | == UART == | ||
Revision as of 13:29, 31 December 2021
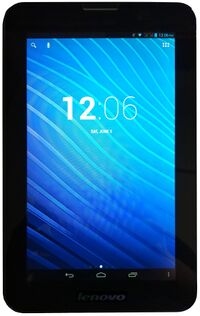
 Lenovo A3000 running stock Android | |
| Manufacturer | Lenovo |
|---|---|
| Name | IdeaTab A3000 |
| Codename | lenovo-a3000 |
| Released | 2013 |
| Hardware | |
| Chipset | MediaTek MT6589 |
| CPU | 4x 1.2 GHz Cortex-A7 |
| GPU | PowerVR SGX544MP @ 286 MHz |
| Display | 1024x600 LCD |
| Storage | 4/8/16 GB |
| Memory | 1 GB |
| Architecture | armv7 |
| Software | |
| Original software | Android 4.2.2 |
| postmarketOS | |
| Category | testing |
| Pre-built images | no |
| Mainline | partial |
| Flashing |
Works |
|---|---|
| USB Networking |
Works |
| Internal storage |
No data |
| SD card |
No data |
| Battery |
Partial |
| Screen |
Works |
| Touchscreen |
Works |
| Multimedia | |
| 3D Acceleration |
No data |
| Audio |
No data |
| Camera |
No data |
| Camera Flash |
No data |
| Connectivity | |
| WiFi |
Broken |
| Bluetooth |
No data |
| GPS |
No data |
| NFC |
No data |
| Modem | |
| Calls |
No data |
| SMS |
No data |
| Mobile data |
No data |
| Miscellaneous | |
| FDE |
No data |
| USB OTG |
Works |
| HDMI/DP |
No data |
| Sensors | |
| Accelerometer |
No data |
| Magnetometer |
No data |
| Ambient Light |
No data |
| Proximity |
No data |
| Hall Effect |
No data |
| Haptics |
No data |
| Barometer |
No data |
Contributors
- Tooniis
- Wujekbrezniew
Maintainer(s)
- Wujekbrezniew
Users owning this device
- Tooniis (Notes: A3000-H)
- Wujekbrezniew (Notes: A3000-H 4GB)
Building
Building is not that easy as from normal kernel source. Kernel source that is linked in Sources section has non standard .config generation procedure. To edit kernel config you need to go to $kernel_source_dir/mediatek/config/mt6589/autoconfig/kconfig and edit "platform" file. Unfortunatelly running make overwrites .config by generating one config from mediatek/config folders. This depends on TARGET_KERNEL_PRODUCT value so "make menuconfig" is basicly useless. However you can generate .config by running "make menuconfig", check what values where added and copy them to mentioned "platform" file. This is bit tricky and propably will generate some config questions by running make so after changing some values you need to patch "platform" config by yourself. In this part you can try to build a kernel without pmbootstrap tools - in standard way that is described in many articles. Environmental values that are needed to build kernel standard way are in $kernel_source_dir/shell_variables so you only need to download proper toolchain (read this file to find out which) and later do . ./shell_variables.
Fortunately proper fixes were added to config in kernel source git repo on branch "postmarketos" so if you only want to build a system for your A3000 you dont need to thinker problems that were mentioned in upper paragraph.
Build kernel with --src flag linking to kernel source code directory. There's high propability that standard way of building will fail.
Kernel config that is obligatory by pmbootstrap is basicly dummy because of how this source code works. Doing pmbootstrap Kconfig does not work because make will not have TARGET_KERNEL_PRODUCT value exported.
Flashing
Fastboot is broken on this device.
To generate system.img and boot.img do: "pmbootstrap export [dir of choise]" after building system. To flash device you need SpFlashTool which works both on Windows and Linux (after unpacking and deleting lib folder) and flash files. Those can be obtained from Custom Android Build or from prebuild pmOS package. Both linked in sources section. SpFlashTool does not automaticaly detect PostmarketOS images so you need to select them manualy in gui. BOOTIMG will be PostmarketOS boot.img and SYSTEM will be lenovo-a3000.img.
To create flash files by your own you need to resize partitions with MTK Partition Editor. However don't forget to persist partition layout in terms of names (this is not confirmed by 100% but removing unnecesary partitions can propably generate errors in "mmcblk names"). Prebuild package has modified partition sizes.
Sources
Kernel source: https://github.com/wujekbrezniew/android_kernel_lenovo_mt8389 Use postmarketos branch to build boot and system! Prebuild package: PostmarketOS files:
Android device tree: https://github.com/wujekbrezniew/android_device_lenovo_a3 Android proprietary files: https://github.com/wujekbrezniew/proprietary_vendor_lenovo_a3 Custom Android build (with all SpFlashTool files neccesary to format device): https://forum.xda-developers.com/t/rom-kitkat-4-4-2-v3-0-0-lenovo-a3000-h-stable-version.3414278/
Device can be easily repartitioned with non-open source software called MTK Partition Editor: http://metweaks.com/mtk-partition-editor/
UART
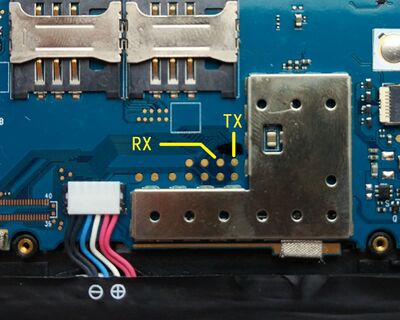
UART is accessible from test points on the board. These are the test points for UART3, which is where bootloader logs can be read from:
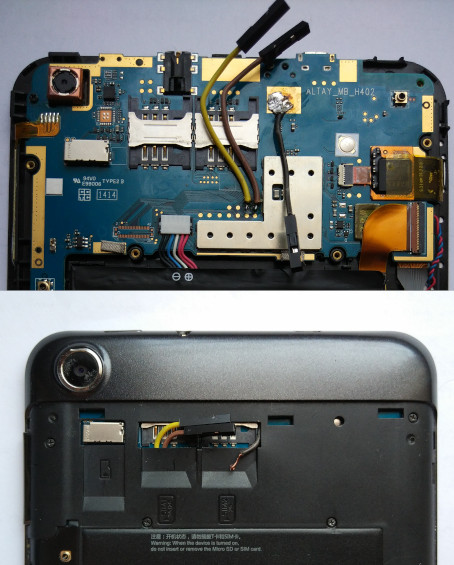
It is possible to solder wires to those points and a ground pad for easy access to UART. Those wires can then be passed through the SIM card slot hole in the back shell. The connectors give the back cover a small bump, so you have to use bare wires if you want it to sit flush.
| WARNING: Bare wires must be insulated properly with tape or some other method to ensure they don't short out with each other or to pins in the SIM card slots. |

