Zhihe series LTE dongles (generic-zhihe): Difference between revisions
Notfound405 (talk | contribs) No edit summary |
Notfound405 (talk | contribs) m Notfound405 moved page Yiming UZ801 v3.0 (yiming-uz801v3) to Zhihe series LTE dongles (generic-zhihe): make it generic |
(No difference)
| |
Revision as of 05:47, 18 April 2023
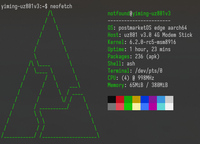
 ssh with executing `neofetch` | |
| Manufacturer | Yiming |
|---|---|
| Name | UZ801 v3.0 |
| Codename | yiming-uz801v3 |
| Released | 2022 |
| Hardware | |
| Chipset | Qualcomm Snapdragon 410 (MSM8916) |
| CPU | 4x 1.0 GHz Cortex-A53 |
| GPU | Adreno 305 |
| Display | none |
| Storage | 4GB/8GB eMMC |
| Memory | 512MB |
| Architecture | aarch64 |
| Software | |
| Original software | Android 4.3 |
| FOSS bootloader | yes |
| postmarketOS | |
| Category | testing |
| Pre-built images | no |
| Mainline | yes |
| Flashing |
Works |
|---|---|
| USB Networking |
Works |
| Internal storage |
No data |
| SD card |
No data |
| Multimedia | |
| 3D Acceleration |
No data |
| Camera Flash |
No data |
| Connectivity | |
| WiFi |
Works |
| Bluetooth |
No data |
| GPS |
Works |
| Modem | |
| Calls |
No data |
| SMS |
No data |
| Mobile data |
Works |
| Miscellaneous | |
| USB OTG |
Works |
| Haptics |
No data |
Contributors
- notfound405
Users owning this device
- Adomerle (Notes: UF896)
- Adrian (Notes: UZ801 V3.2)
- CodeDaraW (Notes: UFI003_MB_V02 & UFI103S_V05)
- Craftyguy (Notes: UZ801 v3.0)
- JIaxyga (Notes: FY_UZ801_V3.2 4Gb)
- Medusa (Notes: UZ801 V3.2)
- NekoCWD (Notes: UF003S_MB_V03. Lab rat, running PostmarketOS)
- Notfound405 (Notes: UZ801 v3.0 & UFI001C_MB_V01 & UFI003_MB_V02)
- Taijigong (Notes: UF896 V 1.1)
- TipzTeam (Notes: JZ0145 & 2 SP970)
- TravMurav (Notes: uf896)
- TryzenAlpensky (Notes: working)
- Vipaol (Notes: PMOS, UFI003S-V01))
- WeirdTreeThing (Notes: UZ801 V3.2)
How to enter flash mode
adb interface is not enabled by default. To enable adb access and root permission, plug this device into your PC and use browser to access this URL: http://192.168.100.1/usb_debug.html, and replug your device. You'll find an adb device and may try the intructions below.
$ adb reboot edl # Qualcomm EDL, or
$ adb reboot bootloader # fastboot.
See the section below if your device bricks.
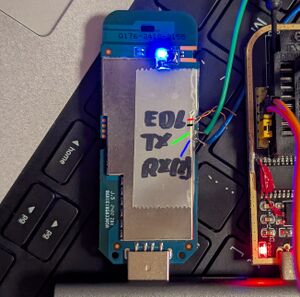
Debug UART pin and test pins
Preparation
It is recommended to backup the eMMC before flashing. Refer to EDL.
The original firmware contains too old firmware to boot mainline kernel, use firmwares from Dragon Board 410c as replacement. Also, you may need qhypstub as well as lk1st (lk2nd is not supported).
$ wget https://releases.linaro.org/96boards/dragonboard410c/linaro/rescue/17.09/dragonboard410c_bootloader_emmc_android-88.zip
$ unzip dragonboard410c_bootloader_emmc_android-88.zip
$ # put your device into EDL mode or fastboot mode and flash sbl1(bak), rpm(bak), tz(bak) with the corresponding files extracted.
For qhypstub and lk1st:
$ git clone https://github.com/msm8916-mainline/qhypstub.git
$ cd qhypstub; git clone https://github.com/msm8916-mainline/qtestsign.git
$ make CROSS_COMPILE=aarch64-linux-gnu-
$ # get generated qhypstub-test-signed.mbn and store it somewhere
$
$ cd ..; git clone https://github.com/185264646/lk2nd.git
$ cd lk2nd; git switch patch; make LK1ST_COMPATIBLE=zhihe,uz801-v3 TOOLCHAIN_PREFIX=arm-none-eabi- msm8916-lk1st # refer to the repository for detailed instructions.
$ ../qhypstub/qtestsign/qtestsign.py aboot build-lk1st-msm8916/emmc_appsboot.mbn
$ # get build-lk1st-msm8916/emmc_appsboot-test-signed.mbn and store it somewhere
$
$ # Now flash them to hyp(bak) and aboot(abootbak) partitions with EDL or fastboot.
Installation
See Qualcomm_Snapdragon_410/412_(MSM8916)#Installation.
partition usage strategy
There are several strategies to make full use of the limited eMMC storage, they are listed below, feel free to add more.
Some common recommendations
- use btrfs for rootfs
$ pmbootstrap install --filesystem btrfs
- reduce the size of /boot partition to 128 MB or even smaller (64MB should be enough to boot, but a slightly larger size is recommended)
$ pmbootstrap config boot_size 128
Examples
- Flash the rootfs and /boot to system partition (not recommended)
$ pmbootstrap flasher flash_rootfs
- The volume of system partiton is too low to hold a rootfs. It works, but the free space is very low, making it painful to use.
- Flash the rootfs and /boot to userdata partition (the easiest)
$ pmbootstrap flasher flash_rootfs --partition userdata
- This one is the easiest, and the volume of userdata partition should be sufficient for common uses. The drawback is that a large amount of storage space is not used.
- split /boot and rootfs, and flash them to different partitions.
$ pmbootstrap install --split
$ pmbootstrap export
$ cd /tmp/postmarketOS-export/
$ img2simg *-root.img root.simg
$ # Put your device into fastboot mode
$ fastboot flash cache *-boot.img
$ fastboot flash system root.simg # or userdata
- The operation is a bit complex, but you can make use of 2 different partitions, which reduces space wasting. It is recommended to flash /boot partition to cache partition and flash rootfs to system or userdata.
- Drawback: not officially supported.
- Note: you may mount the other partition (usually system or userdata, if you flash /boot to cache partition) to, e.g. /var/lib/docker with /etc/fstab and localmount, so that every large partitions can be used.
- repartition
- There are two major choices, one is to replace the entire partition table and use your custom one, the other is to do minor modification with gptfdisk, leaving most partitions untouched.
- replace the entire partition table
- No technical support here. It's dangerous and may brick your device, think twice before proceeding.
- gptfdisk
- This method is much safer than the previous one. Generally, the easiest solution would be combining system and userdata together. You can do it with gdisk, sgdisk or any tools you like. Just delete all partitions after system and extend system to maximum.
See also
- pmaports!3988 Initial merge request
- Device package
- Kernel package
