Google Nexus 5X (lg-bullhead): Difference between revisions
Rahmanshaber (talk | contribs) added Installation section |
Rahmanshaber (talk | contribs) No edit summary |
||
| Line 64: | Line 64: | ||
# Now flash the image <source lang="shell">$ ./pmbootstrap.py flasher flash_rootfs --partition userdata</source> | # Now flash the image <source lang="shell">$ ./pmbootstrap.py flasher flash_rootfs --partition userdata</source> | ||
# Now the kernel <source lang="shell">$ ./pmbootstrap.py flasher flash_kernel</source> Installation is done. Reboot the phone. | # Now the kernel <source lang="shell">$ ./pmbootstrap.py flasher flash_kernel</source> Installation is done. Reboot the phone. | ||
== Firmware == | |||
Here is the official Google page to download GPS, Audio, Camera, Gestures, Graphics, DRM, Video, Sensors firware blob. | |||
[https://developers.google.com/android/drivers /developers.google] | |||
== Mainlining == | == Mainlining == | ||
The | The Linux mainline kernel has very basic support for this phone since November 2016 (one cpu and uart). In January 2017 support for the onboard SDHCI was added and since March 2018 pstore-ramoops. Both should be included in 4.19. | ||
To boot it using pmbootstrap follow the mainlining guide but note that it has a 64 Bit kernel also compared to downstream "device-lg-bullhead" you need to change the debug tty to /dev/ttyMSM0 in the deviceinfo file. | To boot it using pmbootstrap follow the mainlining guide but note that it has a 64 Bit kernel also compared to downstream "device-lg-bullhead" you need to change the debug tty to /dev/ttyMSM0 in the deviceinfo file. | ||
Revision as of 14:00, 30 July 2019
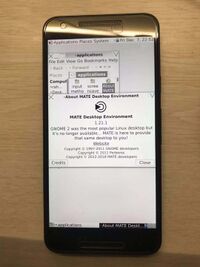
 Nexus 5x | |
| Manufacturer | LG |
|---|---|
| Name | Nexus 5X |
| Codename | lg-bullhead |
| Released | 2015 |
| Hardware | |
| Chipset | Qualcomm MSM8992 Snapdragon 808 |
| CPU | 4x1.4 GHz Cortex-A53 & 2x1.8 GHz Cortex-A57 |
| GPU | Adreno 418 |
| Display | 1080x1920 IPS |
| Storage | 16/32 GB |
| Memory | 2 GB |
| Architecture | aarch64 |
| Software | |
| Original software | Android 6.0 on Linux 3.10 |
| postmarketOS | |
| Category | testing |
| Pre-built images | no |
| Unixbench Whet/Dhry score | 1273.5 |
| Flashing |
Works |
|---|---|
| USB Networking |
Works |
| Internal storage |
No data |
| SD card |
No data |
| Battery |
Works |
| Screen |
Works |
| Touchscreen |
Works |
| Multimedia | |
| 3D Acceleration |
No data |
| Audio |
No data |
| Camera |
No data |
| Camera Flash |
No data |
| Connectivity | |
| WiFi |
No data |
| Bluetooth |
No data |
| GPS |
No data |
| NFC |
No data |
| Modem | |
| Calls |
No data |
| SMS |
No data |
| Mobile data |
No data |
| Miscellaneous | |
| FDE |
No data |
| USB OTG |
Works |
| HDMI/DP |
No data |
| Sensors | |
| Accelerometer |
No data |
| Magnetometer |
No data |
| Ambient Light |
No data |
| Proximity |
No data |
| Hall Effect |
No data |
| Haptics |
No data |
| Barometer |
No data |
Contributors
Unlocking
In android go to →→ and tap the build number 7 times. Then go to →→ and enable OEM unlocking
Reboot to the bootloader and run "fastboot oem unlock" Now select on the phone screen with the volume button and use the power button to accept.
Special key combos
Boot to bootloader: hold volume down + power button until the screen turns on
Launch recovery: first boot to the bootloader, press the volume down button twice and press the power button to select
Installation
- Setup pmbootstrap Choose 'lg-bullhead' as target device And Xfce as ui(as it runs well).
$ ./pmbootstrap.py init
- Create boot image
$ ./pmbootstrap.py -t 30000 install --no-fde
- Now connect the mobile to pc in fastboot mode. Below command format the partitions
$ fastboot format system
- Now flash the image
$ ./pmbootstrap.py flasher flash_rootfs --partition userdata
- Now the kernel Installation is done. Reboot the phone.
$ ./pmbootstrap.py flasher flash_kernel
Firmware
Here is the official Google page to download GPS, Audio, Camera, Gestures, Graphics, DRM, Video, Sensors firware blob. /developers.google
Mainlining
The Linux mainline kernel has very basic support for this phone since November 2016 (one cpu and uart). In January 2017 support for the onboard SDHCI was added and since March 2018 pstore-ramoops. Both should be included in 4.19.
To boot it using pmbootstrap follow the mainlining guide but note that it has a 64 Bit kernel also compared to downstream "device-lg-bullhead" you need to change the debug tty to /dev/ttyMSM0 in the deviceinfo file.
Change deviceinfo (aports/device/device-lg-bullhead/deviceinfo)
deviceinfo_kernel_cmdline="console=ttyMSM0,115200,n8 androidboot.hardware=bullhead boot_cpus=0-5 lpm_levels.sleep_disabled=1 msm_poweroff.download_mode=0 buildvariant=userdebug PMOS_NO_OUTPUT_REDIRECT"
ttyMSM0 tells the kernel to write debug output to the debugger cable, PMOS_NO_OUTPUT_REDIRECT tells the initram script from pmos to write there as well instead as to a (temporary) log file
increase the pkgrel in APKBUILD and rebuild the boot.img
$ pmbootstrap checksum device-lg-bullhead
$ pmbootstrap export
build your kernel as described in mainlining guide
update the boot.img to include your local kernel
$ cp "/tmp/postmarketOS-export/boot.img-lg-bullhead" "$TEMP/boot.img"
$ cd .output/arch/arm64/boot/
$ cat Image.gz dts/qcom/msm8992-bullhead-rev-101.dtb > "$TEMP/zImage-dtb"
$ pmbootstrap chroot -- abootimg -u /tmp/mainline/boot.img  -k /tmp/mainline/zImage-dtb
$ pmbootstrap flasher list_devices
You can communicate with the device using screen (or other software), so in a separate terminal start it
$ screen /dev/ttyUSB0 115200
Boot your mobile to bootloader (power + vol down), you should see some debug output already in screen
Boot mainline kernel using fastboot
$ pmbootstrap chroot -- fastboot boot /tmp/mainline/boot.img
Device teardown:
https://www.ifixit.com/Teardown/Nexus+5X+Teardown/51318
Downstream DTS: https://github.com/franciscofranco/bullhead/blob/oreo-mr1/arch/arm/boot/dts/qcom/msm8992.dtsi
Photos

|

|

|